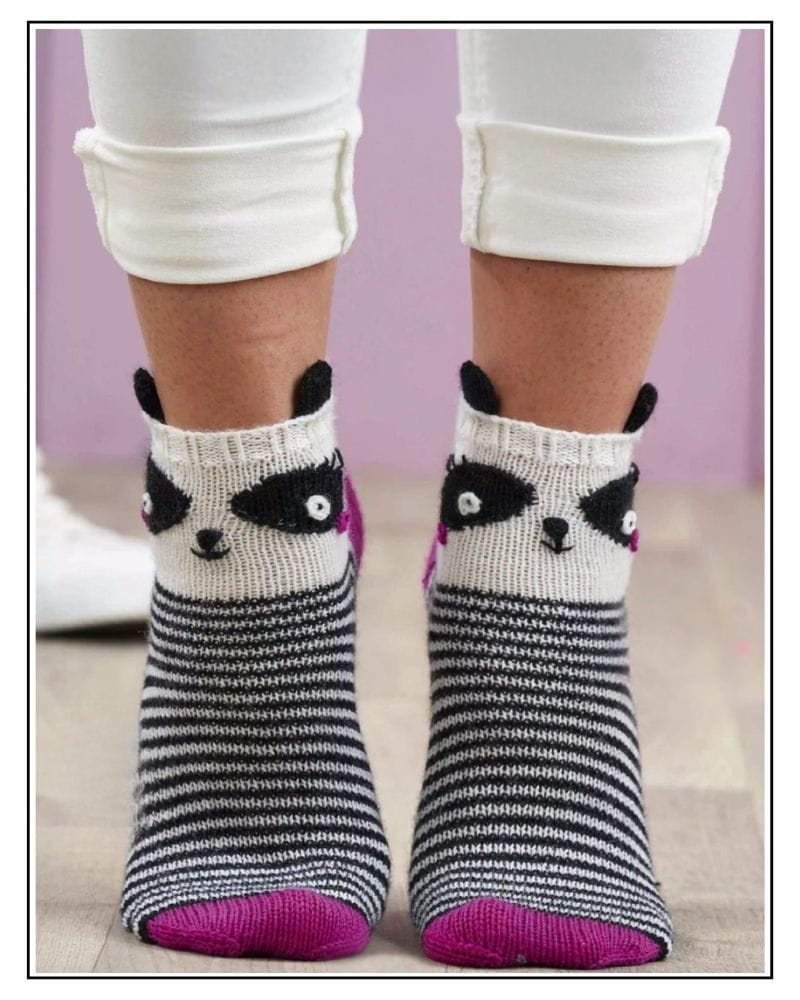
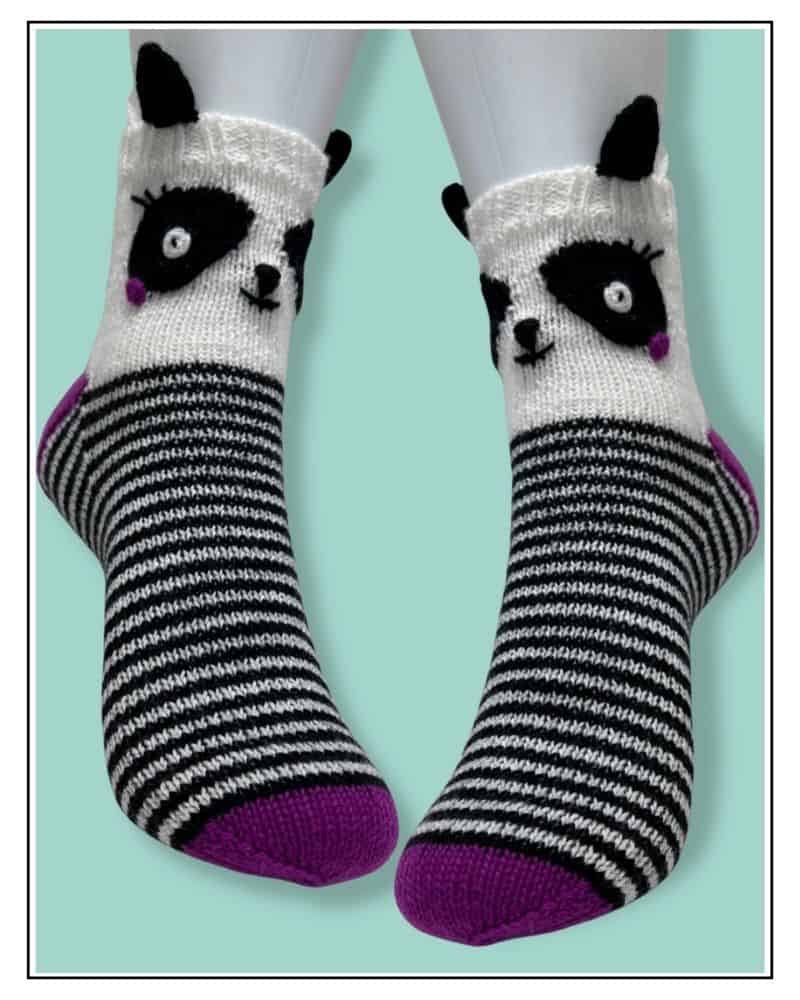
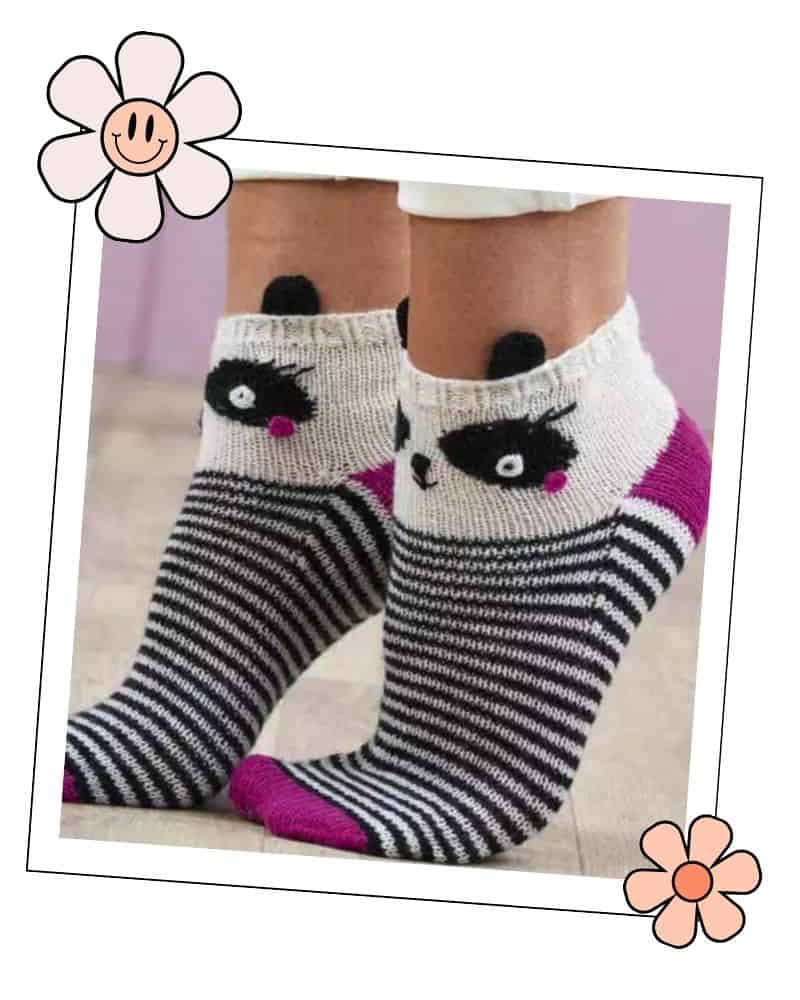
So many of you told me how much you loved my Piggy Socks that I thought I would add some cute knitted panda socks to the collection. Iconic panda socks, black and white stripes, a magenta heel and toe, two little ears, and the sweetest panda. How can you resist?
These are a great gift knit for most of the family, most being those who love pandas, but not babies (these are not sized for such little feet). The sizes run from older children right up to adults. I know socks as a gift get a bad reputation for being boring, but not these kawaii cuties. (Did you know kawaii is Japanese for cute?)
Quick Look
What you’ll find in this post:
- The complete free knitted panda socks pattern in six sizes, from older children to adults
- Full materials list: yarn, needles and tension
- The panda face chart, plus a line by line written version for the chart averse
- Step-by-step Kitchener stitch for a smooth toe
- A link to the printable PDF if you would prefer one
Why These Knitted Panda Socks Are Easier Than They Look
If your hunt for cute sock knitting patterns, without too much faffing brought you here, you are in the right place. Most panda socks are knitted in the round, which leaves you working the face in duplicate stitch or wrestling with intarsia in the round. This pattern does it differently.
The cuff and leg are worked flat. That keeps the intarsia super simple. You knit back and forth and twist the yarns at each colour change, exactly as you would on a jumper. If you have never tried intarsia, the Robot Baby Bib is a gentle first go.
The rest of the sock is worked in the round. Once the leg is done, you join it up and carry on as a regular top-down sock, so there are no seams under your foot to rub. The only seam runs up the back of the leg, closed with mattress stitch. After 18 years of designing knits for children, I have learned that a seam that rubs is the quickest way to get a pair of socks abandoned in a drawer.
Prefer duplicate stitch? Knit the leg in plain white and add the panda eyes afterwards in duplicate stitch, following the same chart.
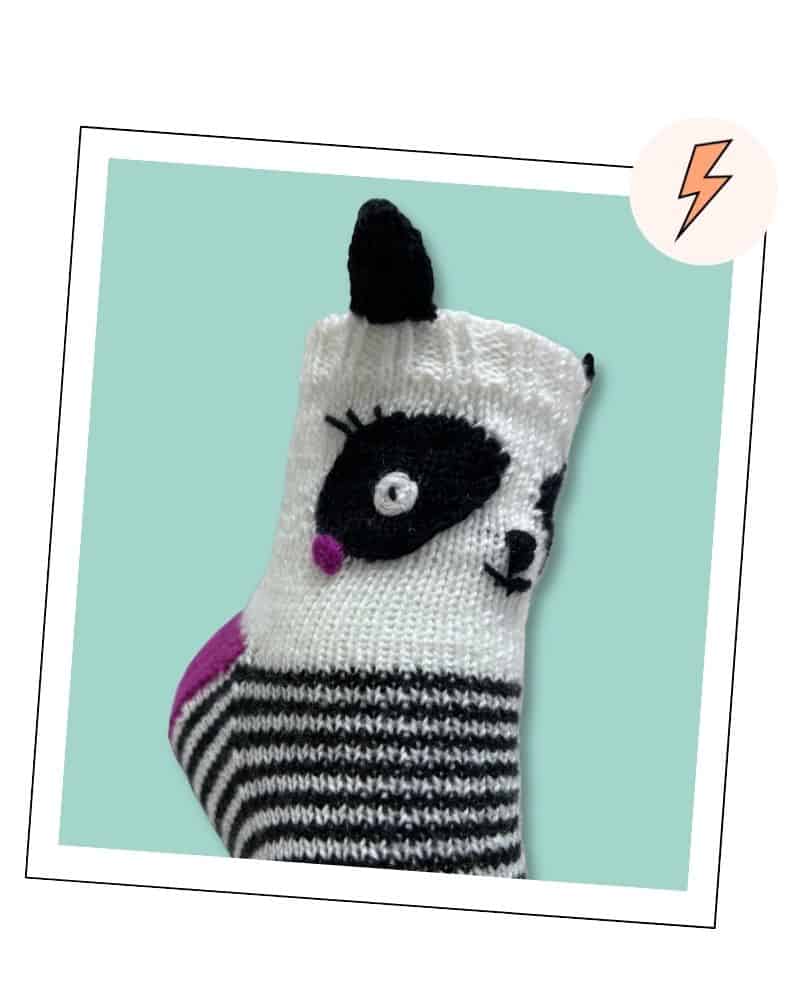
The foot is striped two rounds black, two rounds white, with the yarn not in use carried up the inside. No cutting, no rejoining, and no small mountain of ends waiting for you at the end.
Not a fan of charts? Every row of the panda face is also written out line by line, so if you are chart averse, you can follow the words instead.
Knitted Panda Socks Pattern: Sizes and Materials
The knitted panda socks come in six sizes, XS to XXL, measured by foot circumference. Measure around the widest part of the foot and knit the size closest to that measurement. The embroidery takes a little of the stretch out of the fabric, so if in doubt, knit the next size up.
| Size | XS | S | M | L | XL | XXL | |
|---|---|---|---|---|---|---|---|
| To fit foot circumference | cm | 18 | 19 | 20 | 21.5 | 22.5 | 24 |
| in | 7 | 7.5 | 7.75 | 8.5 | 8.75 | 9.5 | |
| Finished foot circumference | cm | 16.5 | 17.5 | 18.5 | 20 | 21 | 22.5 |
| in | 6.5 | 7 | 7.25 | 7.75 | 8.25 | 8.75 |
Yarn
Yarnsmiths Merino Sock, 4ply (75% wool, 25% nylon), 400m (437yds) per 100g ball. One ball of each colour makes a pair in every size.
- Yarn A: White (2K040)
- Yarn B: Black (2K000)
- Yarn C: Magenta (2K367)
Knitting in the US? Cascade Heritage is a good substitute, a fingering weight 75% superwash merino, 25% nylon, with the same 400m (437yds) per 100g.
Needles and Notions
- 2.5mm (US 1.5) straight needles
- 2.5mm (US 1.5) double pointed needles, or a 60 to 80cm (24 to 32in) circular needle for working in the round
- Darning needle
- Stitch markers
Tension
34 sts x 44 rows = 10cm x 10cm (4in x 4in) using 2.5mm (US 1.5) needles and stocking stitch, unblocked. Socks are a close fit, so it is worth checking your tension (gauge) before you start.
Skill Level
Confident beginner sock knitter. If you are happy with a heel flap and gusset, and willing to give a little intarsia a go, you have everything you need.
Abbreviations
These are the abbreviations used in this pattern. For the full list, download my free Knitting Abbreviations Guide.
| Abbreviation | Meaning |
|---|---|
| k / p | knit / purl |
| k1tbl / p1tbl | knit / purl 1 st through the back loop |
| k2tog | knit 2 sts together |
| p2tog | purl 2 sts together |
| ssk | slip 2 sts knitwise one at a time, then knit them together through the back loops |
| sl1 | slip 1 st |
| pm / sm | place marker / slip marker |
| st(s) | stitch(es) |
| st st | stocking stitch |
| RS / WS | right side / wrong side |
| rep / rem / cont | repeat / remaining / continue |
| approx | approximately |

The Panda Socks Pattern
Sizes are given as XS (S: M: L: XL: XXL). Where only one figure is given, it applies to all sizes. Make two socks.
Cuff
Cast on 58 (62: 66: 70: 74: 78) sts using 2.5mm (US 1.5) straight needles and Yarn A.
Row 1 (RS): K1, *(k1tbl) twice, p2; rep from * to last st, k1.
Row 2 (WS): P1, *k2, (p1tbl) twice; rep from * to last st, p1.
Rep last 2 rows until cuff measures 2.5cm (1in) from cast on edge, or desired length, ending after a WS row.
Leg
Row 1 (RS): Knit to end.
Row 2 (WS): Purl to end.
Rows 3 and 4: Rep Rows 1 and 2.
Commence working from the Chart below, reading RS rows from right to left and WS rows from left to right.
Row 1 (RS): K14 (16: 18: 20: 22: 24), work Row 1 of Chart, knit to end.
Row 2 (WS): P14 (16: 18: 20: 22: 24), work Row 2 of Chart, purl to end.
Cont working from Chart as set until all 16 rows are complete.
Work in st st until leg measures approx 12 (12: 13: 13: 14: 14) cm / 4.75 (4.75: 5: 5: 5.5: 5.5) in from cast on edge, or desired length, ending after a WS row.
Joining row (RS): K13 (14: 15: 16: 17: 18), ssk, k28 (30: 32: 34: 36: 38), pm, k2tog, knit to end. 56 (60: 64: 68: 72: 76) sts
Redistribute sts onto double pointed needles or a circular needle and join to work in the round, taking care not to twist.
Next round: With RS facing, knit to marker.
Change to Yarn C.
The Panda Face Chart
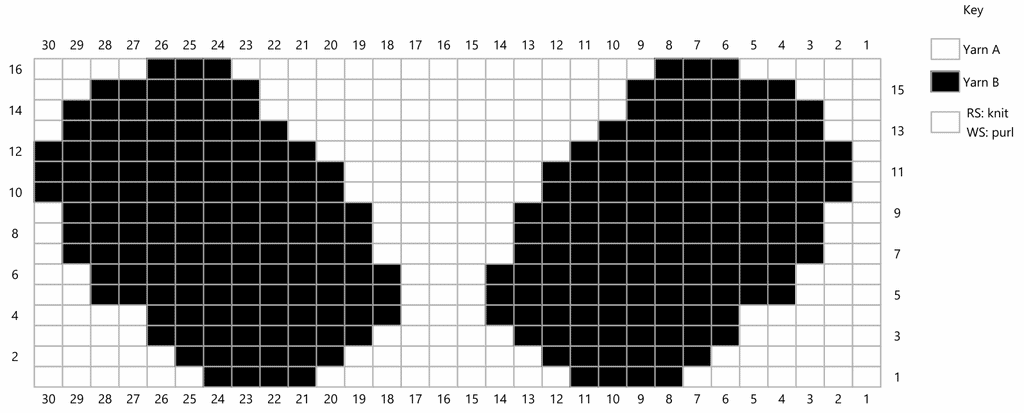
The chart is 30 sts wide and 16 rows tall. White squares are Yarn A and black squares are Yarn B. Use a separate small ball or bobbin for each block of colour, and twist the yarns together at each colour change so no holes appear.
If you prefer written instructions, here is the chart row by row.
Row 1 (RS): Knit 7 white, 4 black, 9 white, 4 black, 6 white. (30 sts)
Row 2 (WS): Purl 5 white, 6 black, 7 white, 6 black, 6 white.
Row 3: Knit (5 white, 8 black) twice, 4 white.
Row 4: Purl 4 white, 9 black, 3 white, 9 black, 5 white.
Row 5: Knit (3 white, 11 black) twice, 2 white.
Row 6: Purl 2 white, (11 black, 3 white) twice.
Row 7: Knit 2 white, 11 black, 5 white, 11 black, 1 white.
Row 8: Purl 1 white, 11 black, 5 white, 11 black, 2 white.
Row 9: Work as Row 7.
Row 10: Purl 11 black, 7 white, 11 black, 1 white.
Row 11: Knit 1 white, 11 black, 7 white, 11 black.
Row 12: Purl 10 black, 9 white, 10 black, 1 white.
Row 13: Knit 2 white, 8 black, 11 white, 8 black, 1 white.
Row 14: Purl 1 white, 7 black, 13 white, 7 black, 2 white.
Row 15: Knit 3 white, 6 black, 13 white, 6 black, 2 white.
Row 16: Purl 4 white, 3 black, 15 white, 3 black, 5 white.
Heel Flap
Worked flat over the next 28 (30: 32: 34: 36: 38) sts only.
Row 1 (RS): *Sl1, k1; rep from * to end of heel sts, turn.
Row 2 (WS): Sl1, purl to end.
Rep last 2 rows until 26 (30: 32: 32: 34: 34) rows are complete.
Heel Turn
Row 1 (RS): K15 (16: 17: 18: 19: 20), ssk, k1, turn.
Row 2 (WS): Sl1, p3, p2tog, p1, turn.
Row 3: Sl1, k4, ssk, k1, turn.
Row 4: Sl1, purl to 1 st before gap, p2tog, p1, turn.
Row 5: Sl1, knit to 1 st before gap, ssk, k1, turn.
Cont as set until all sts are worked, omitting the final k1 and p1 on the last 2 rows for sizes S, L and XXL. 16 (16: 18: 18: 20: 20) sts
Cut Yarn C.
Heel Gusset
Begin working in the round again.
Set-up round: With RS facing and Yarn A, knit across heel sts, pick up and knit 13 (15: 16: 16: 17: 17) sts along side of heel flap, pick up and knit 1 st at corner from row below to prevent a hole, pm, knit across 28 (30: 32: 34: 36: 38) instep sts, pm, pick up and knit 1 st at corner from row below to prevent a hole, pick up and knit 13 (15: 16: 16: 17: 17) sts along other side of heel flap, then knit across 8 (8: 9: 9: 10: 10) heel sts. Place marker for beginning of round. 72 (78: 84: 86: 92: 94) sts
Next round: Knit.
Shape Gusset
Round 1 (Dec): Using Yarn B, knit to 3 sts before marker, k2tog, k1, sm, knit to next marker, sm, k1, ssk, knit to end. [2 sts decreased]
Round 2: Using Yarn B, knit to end, slipping markers.
Round 3 (Dec): Using Yarn A, work as Round 1.
Round 4: Using Yarn A, knit to end, slipping markers.
These 4 rounds set the 2 round stripe pattern. Carry the yarn not in use up the inside of the work.
Rep Rounds 1 to 4 until 56 (60: 64: 68: 72: 76) sts remain.
Foot
Knit to next marker (start of instep sts) and remove beginning of round marker. This is now the new beginning of round.
Cont in stripe pattern as set until foot measures 3 (3.5: 3.75: 4: 4.5: 5) cm / 1.25 (1.5: 1.5: 1.5: 1.75: 2) in less than desired foot length.
Change to Yarn C.
Next round: Knit.
Shape Toe
Round 1 (Dec): *K1, ssk, knit to 3 sts before marker, k2tog, k1, sm; rep from * once more. [4 sts decreased]
Round 2: Knit to end, slipping markers.
Rep Rounds 1 and 2 until 36 (40: 44: 44: 44: 44) sts remain.
Work Round 1 only until 20 sts remain.
Finishing the Toe
Slip all instep sts onto one needle. 10 sts
Slip all sole sts onto another needle. 10 sts
Holding the two needles together, graft sts using Kitchener stitch, as below.
Kitchener Stitch
Kitchener stitch joins the toe stitches invisibly, with no seam. If you would like to see it worked, Very Pink Knits has a clear Kitchener stitch video.
Cut yarn, leaving a tail of approx 30cm (12in), and thread it onto a darning needle. Hold the two needles parallel in your left hand, with wrong sides together and the needle tips pointing to the right. The instep needle is at the front and the sole needle is at the back.
Set-up
Front needle: Insert darning needle into first st purlwise, pull yarn through and leave st on needle.
Back needle: Insert darning needle into first st knitwise, pull yarn through and leave st on needle.
Step 1: Front needle: Insert darning needle into first st knitwise and slip st off needle.
Step 2: Front needle: Insert darning needle into next st purlwise, pull yarn through and leave st on needle.
Step 3: Back needle: Insert darning needle into first st purlwise and slip st off needle.
Step 4: Back needle: Insert darning needle into next st knitwise, pull yarn through and leave st on needle.
Rep Steps 1 to 4 until one st remains on each needle.
Last 2 sts
Front needle: Insert darning needle knitwise and slip st off needle.
Back needle: Insert darning needle purlwise and slip st off needle.
Gently ease the grafted sts to match your knitting tension, using the tip of the darning needle. Take the tail through to the inside and weave in.
Tip: To remember the sequence, say “front, knit off, purl on; back, purl off, knit on” as you go.
Ears (make 2 per sock)
Using 2.5mm (US 1.5) needles and Yarn B, cast on 18 sts.
Rows 1 to 6: Beginning with a knit row, work in st st.
Row 7 (RS): (K1, ssk, k3, k2tog, k1) twice. 14 sts [4 sts decreased]
Cut yarn and, using a darning needle, thread through rem 14 sts and pull tight to form top of ear. Sew side seam and cast on edge closed.
Making Up
Using the photo as a guide, work backstitch around the outside of the eyes using Yarn B. Using Yarn B, embroider the eyelashes and nose. Using Yarn C, embroider the cheeks. Using Yarn A, embroider the pupils.
Using the photo as a guide, line the outer edge of each ear up with the outer eyelash and sew the ears into position.
Using Yarn A and mattress stitch, close the back seam. Note there is a 2 st allowance for this seam.
Get the Ad-Free PDF
If you would rather not knit with your phone propped up against the yarn bowl, the panda socks are also available as an ad-free PDF in my shop. It is laid out for printing, with the colour chart, the written chart rows and the Kitchener stitch steps all in one tidy document, ready to save, print and scribble on.
Knitted Panda Socks FAQ
What sizes do the knitted panda socks come in?
There are six sizes, XS to XXL, to fit a foot circumference of 18 to 24cm (7 to 9.5in). That covers older children through to adults. These are not baby socks, so measure the foot of the person you are knitting for and choose the closest size.
Why is the leg knitted flat?
Working the leg flat keeps the intarsia super simple. You twist the yarns at each colour change and work back and forth, just as you would on a jumper, rather than trying to manage intarsia in the round. This knitted panda pattern then joins into the round for the heel, foot and toe.
Will there be a seam under my foot?
No. Everything from the heel flap down is worked in the round, so there are no seams under the foot to rub. The only seam runs up the back of the leg, and the toe is grafted with Kitchener stitch for a smooth finish.
Can I use duplicate stitch instead of intarsia for the panda eyes?
Yes. Knit the leg in plain white, then add the eyes afterwards in duplicate stitch, following the same chart. It is a good option if intarsia is new to you.
Is this pattern suitable for a beginner sock knitter?
It is a good pattern for a confident beginner sock knitter. If you have turned a heel and picked up a gusset before, you will be fine. The panda face is only 16 rows, and the Kitchener stitch toe is written out step by step.
What yarn can I use instead of Yarnsmiths Merino Sock?
Any 4ply sock yarn with some nylon in it will work, as long as you match the tension. In the US, Cascade Heritage is a close match, with the same fibre blend and 400m (437yds) per 100g.
Looking for more sock knitting patterns?
If you love knitting socks that make people smile, check out my Watermelon Socks they are free on the blog too.

Stay in Touch
If you would like new patterns, free resources, and the occasional dry observation about knitting for children delivered straight to your inbox, you can join the list here:
Sign up for the Jane Burns newsletter